Recently I decided to script the build of my ESX hosts at home, which would enable me to rebuild them easier (if the need arose). The added side effect is you can get identical configurations easily without resorting to host profiles. After doing this I realised it would be of use at work where I’m about to build 9 nearly identical clusters. This post will be more of a brain dump of the whole process for my reference and possible use of others. I’ll focus on the enhancements for use at work.
The high level overview is this. PXE boot the ESX installer, with a parameter pointing to the kickstart file. That parameter points to a web server script which produces a host specific kickstart file. The enhancement for use at work, is that first kickstart file is simple but obtains the hosts Dell Service Tag and passes that to the web server to produce the rest of the kickstart file.
PXE boot the installer. I installed a minimal installation of Fedora 20 in a VM and added; dnsmasq, syslinux-tftpboot, nginx, php-fpm. This VM has 2 networks, one (ens192) is connected to the local LAN, and the second (ens224) is the network builds will occur on.
Syslinux is on there as it drops the pxelinux binaries and builds out a /tftpboot folder. Nginx is a web server, and php-fpm is installed as I knocked up a quick script for templating the kickstart files in PHP (don’t hate me).
DNSmasq is a simple DHCP server which can do DNS and TFTP too, so a no brainer for this deployment. I used a very simple configuration for DNSMasq which I put in the fragment directory. This configuration can probably be simpler but I just based it off a working one from my openwrt box (which I already had PXE working on for Linux installers). After creating the config file, enable and start the service.
File: /etc/dnsmasq.d/buildbox.conf
|
|
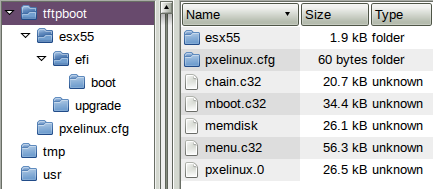
The pxelinux configuration is very similar to syslinux, which is great because ESX uses syslinux for installing and booting installed machines. An easy mistake to make with setting this up is pxelinux.cfg is a directory NOT a file. Again I setup a basic configuration based off one I already used so know it works. The file below sets up a simple interactive menu showing the available options; local HDD, ESX installer, ESX kickstart. Note: this shows esx5.1 (for work) but it does work fine with 5.5 (home). Also see the tree structure of the basic TFTP boot area - note pxelinux.cfg is a folder and the other files (supplied by syslinux) are in the tftproot, also note esx is in a sub-folder.
File: /tftpboot/pxelinux.cfg/default
|
|
The ESX files need to be loaded onto the tftp server too. I keep them in a subdirectory off the tftproot to make it easy to add/change later. Simply copy all files off your esx iso into a location like /tftpboot/esx51 as I used. Then edit the /tftpboot/esx51/boot.cfg file to cater for the changed root dir. The lines that need editing are kernel=/esx51/tboot.b00 and modules=. Every file reference needs the path included so add /esx51/ to each file.
That will get you a PXE booting ESX installer, but to make it more useful for kickstarting lets do the rest.
Nginx setup. Setup nginx to use php via php-fpm. This is a very simple config file with any security options removed. On an isolated network it’s probably fine but I wouldn’t leave this running on any real web server. Also note the web root is /www which is where we’ll be putting files. Setup PHP by setting the timezone (avoids an error);
|
|
Now enable and start the php-fpm service. Once the nginx file is saved, enable and start nginx.
File: /etc/nginx/conf.d/default.conf
|
|
I’d recommend testing the web server from another host and make sure php works. Drop a file on there like this to test. If this script produces the phpinfo page then it’s working, if not hit the logs and see why not.
File: /www/test.php
|
|
Now for the actual kickstart part. I found plenty of good resources for this online, so it wasn’t hard to get a working config going pretty quickly allowing me to focus my efforts on specific requirements. For home I use a templated kickstart file, which based off a number passed to the php script I get one host or another - this means my pxelinux menu has entries for each host as the url is slightly different. For work however I wanted to be more efficient than this - due to the much larger number of hosts I didn’t want to have heaps of menu options. Fortunately I was able to get the Dell Service Tag (ultimately a short serial number) off the server prior to ESX installation. We track the assets using this number so it’s helpful to know service tag 1234XYZ belongs to company ABC and is destined for location JKL or whatever.
The work flow is this:
- PXELinux menu includes a URL to a simple file /ks.txt. That file is the kickstart file.
- ESX installer boots (over tftp) and downloads the ks.txt file (over http).
- The kickstart file (ks.txt) includes a pre-install script to determine the service tag and pull down the rest of the configuration over http.
- The web server returns a service tag specific kickstart file for a supplied service tag.
- ESX installer uses the now complete kickstart file to complete the installation
The idea was to use esxcli hardware platform get to get the service tag and supply that to the php script. In the outputs below the Dell Service Tag is the serial number line.
|
|
Base kickstart file (rev 0):
|
|
I won’t go into details about the ks-conf.php script - basically it takes the service tag in, and pulls details out of a csv to produce this hosts complete configuration (all settings, IP’s and vswitches). As what usually happens to me, this was too easy and was bound for issues. Once I’d eliminated any obvious issues I got to the point of checking the nginx access log I found out the service tag was coming through blank. Fortunately during the ESX installer you can still get a shell, where I quickly learned esxcli doesn’t work, dmidecode isn’t present so that was no use BUT the older tools still work, so I had to adjust to use esxcfg-info instead. After a bit of hunting I found the info I needed and using the few tools available in the installer environment ended up with this;
Base kickstart file (rev 1, changed line only):
|
|
That worked, and now I was cooking with gas. Other things to note. The base kickstart file’s network line is in my case for installation only - DHCP on 192.168.0.x network. This network is still present for the %post script so I was able to download additional packages from the web server for installation later. In the %firstboot section I setup vmk0’s target IP for the destination network, and all the other settings necessary. Below is a sample of the resulting templated script out of ks-conf.php. I’ve replaced all possibly sensitive details and reduced the config to only show the basic configuration (all other vswitches are based off the same template as vSwitch2 only with different vmnic’s and vlans). In the interest of readability I’ve left all my comments in this.
Sample output from ks-conf.php?st=xxxx123
|
|
Things to note:
- The DNS search domain and server from DHCP are removed in %firstboot
- I’m pxebooting on vmnic20 which is to be a management interface.
- NFS and vmotion are on the same vswitch, in my case this is because that vswitch is 10Gbit.
- My hosts all have additional vswitches for different networks (physical lan separation), I’ve only showed one of them as VMNET1 above.
- SNMP hasn’t been enabled, as my hosts hosts are being installed then shipped not installed in place.
- For the installer to add the NFS datastores, they have to be available at the time of installation.
- I haven’t assigned licenses at this stage. This could be done easily however I prefer to add them when joining the host to vSphere.
Oh and as per usual, the buildbox VM was also built with kickstart which preconfigures everything as above, and dumps the scripts and templates down - just in case I need to rebuild that too.
That’ll do for now. I’ve got another vmware related post coming soon.