For a recent experiment I needed a wan simulator, so I decided to build one. Using FreeBSD makes this very easy, however many of the sites I went to had partial, incomplete, or no longer working examples.
Specifically what I wanted was a vmware virtual machine capable of Layer 2 wan simulation. Layer 2 is easier because theres no routing or subnet changes to mess around with, just simply a single subnet with some hosts further away than others. It had to be a VM as my whole lab environment is virtual, so it makes sense to just put a vm between 2 vswitches and get the restricted bandwidth, increased latency and packet loss.
Now I present to you the FreeBSD 9.1 based VMware hosted layer 2 wan simulator.
First off, the VMware bits.
- Create a new vswitch for the “far” side of the link. For convenience I keep my LAN on the near side, so only the machines you want remote are at the far end.
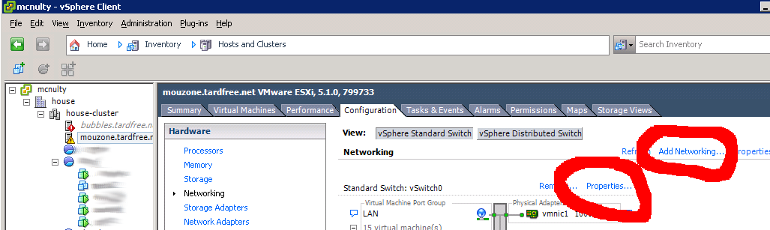
- On the host configuration tab, Networking page, click on Add Networking. The defaults should be ok.
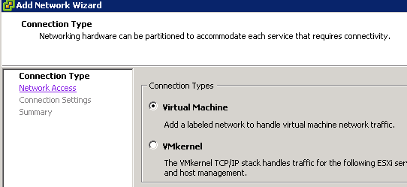
- Connection type: virtual machine
-
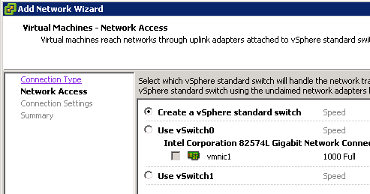
Create a new standard vswitch. Give it whatever label you want, I called mine “FAR” so it’s clear what it is. This vswitch has no physical adapters connected. If you have spare ethernet ports (or vlan capable switch) you could connect the far side network to a physical device.
-
Next, on both of your vswitches, enable Promiscious mode. This is so this VM can pass traffic between the switches which isn’t heading to or coming from the machines MAC address.
- On the host configuration tab, Networking page, click Properties on each vswitch
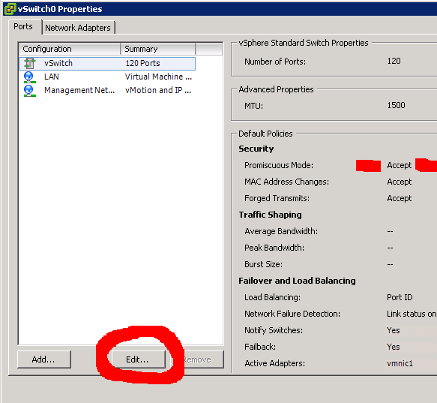
- Then click edit if Promiscuous mode isn’t enabled.
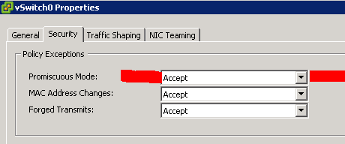
- and Enable it.
- Now create a new VM with 2 nics, both Intel e1000. I gave it 256MB ram and a 2GB disk.
- Guest OS type “other” and “FreeBSD 64bit”
- It doesn’t need this much disk, however I’m not sure how small before the installer will complain. Once installed it uses about 650MB of disk for root.
Now the FreeBSD bits.
- Perform a base freebsd install. I used the FreeBSD-9.1-RELEASE-amd64-dvd1.iso disk image.
- Boot up the machine and the installer should boot to a prompt, select Install.
- For “Distribution select” I unchecked everything as a wansim doesn’t need anything.
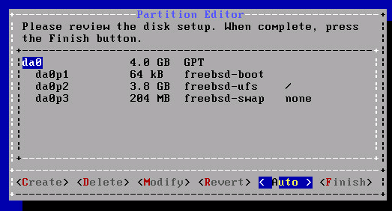
- Guided Partitioning, use entire disk, then tab across to Finish and accept and commit the changes.
-
Set your root password, and for now just configure one of the network interfaces as DHCP.
-
At the system configuration screen, be sure to leave “sshd” enabled.
-
I disabled crash dumps and did not add any users to the system. We’ll enable ssh as root for adjusting settings.
-
Exit the installer and go into the manual configuration shell to make additional changes.
-
Use vi to edit /etc/ssh/sshd_config to change the following line:
|
|
to
|
|
- This allows you to ssh in as root. Now exit the shell and let the system reboot.
- Once it reboots, ssh in as root (you might want to console in as root to run ifconfig to get your ip, or tail your dhcp server logs).
- Now make the following additions (you could have done this before, but it’ll be easier to copy/paste via ssh than the vmware console.)
- Edit your /etc/rc.conf to change all the ifconfig lines to the following:
|
|
- And at the bottom of /etc/rc.conf add the following:
|
|
- To your /boot/loader.conf add the following (file might not exist to start with.)
|
|
- To your /etc/sysct.conf add the following.
|
|
- Reboot the vm, and now the 2 vswitches should be connected with a 1Mbit link and 100ms delay (200ms round trip time).
- From the wansim vm, ping your gateway and it should respond with a RTT of double the delay line in rc.conf
For a more complicated and possibly real world setup, say asymmetric bandwidth settings, try this instead in the rc.conf. This assumes em0 is connected to the LAN network, and em1 is connected to the FAR network. This applies the shaping and delay on outbound traffic allowing each direction to be controlled individually.
|
|
Now if you’re lazy like me and want to make this exact setup quicker, at the installer shell stage you can download and run a little script to do all of this for you. This assumes you selected DHCP for em0 in the installer, otherwise that bit won’t work.
|
|
Going even further, if you wanted to have some packet loss on your links. Say simulating a C Band satellite connection, change the pipe configuration to include “plr 0.05”. The number is the percentage of packets to lose as a value between 0 and 1, 0 being no packets dropped, 1 being all packets dropped. So 0.05 would cause about 5% of packets to be dropped. For satellites too the latency is usually between 400 and 700ms RTT, so a delay of 300 in each direction would be fair (note, multihop satellite links would be more again). For asymmetric links, add it to both pipe configurations otherwise you’ll only get loss in one direction.
|
|
It’s as easy as that.