So the long planned rebuild of my home storage box had been through a few different revisions over the months. Originally I was pretty set on the backblaze case and design. Aiming more for bulk storage than fast. I even went as far as procuring the 9 port mulipliers for this however never found a cheap enough way to get the bare chassis. When comparing the price that the complete backblaze option would cost it even made little sense for anything other than sheer bulk storage.
Next up I was considering getting an entry level NetApp. As I’m in the industry the pricing I could get was looking pretty good - however it was still going to be a tough sell. Limited expandability due to high cost of disk shelves vs the up front system cost. When you factor in the up front cost including ALL disks over 3 years it started to look not so terrible. But it all fell apart when I thought about how to back it up (my current system is backed up zfs send/recv style) which NetApp can do (SnapMirror) however I couldn’t simply splurge for a 2nd one. Also with a pretty firm price floor of about $6000 and not having any option on expansion I just couldn’t justify it - too many dollars for too little storage. Sure it’d be fast, easy to manage, reliable and quality, for 2 times the price of a DIY box but unable to back it up. Backups are important, very important.
So after that I decided to go down a road quite a few others have too. Off the shelf 4RU 24bay case and cheap LSI SAS HBA’s. The only downside was the limitation of 24 drives. To go beyond that I’d either need to build a complete second box, or buy the disk shelf version and additional HBA’s. For now that’s a future me problem. Fortunately the case was cheap compared to a backblaze one, and included the hotswap backplanes. In a few ways this is the same as the expansion problem of the NetApp (buy a second or high priced shelves) but at least backing it up is possible (current backup box still works) and because I don’t need to buy disks it costs only a third of the NetApp.
Regardless of the overall system design, I’d already selected a mainboard & cpu combination. An Intel CPU obviously, and a server class board to ensure enough sufficiently wide PCIe slots.
So the overall parts list is this (and rough price);
- Intel Xeon E3 CPU (I got the E3-1230v2 3.3ghz) ($270)
- Intel S1200BTL server board ($240)
- 16GB ECC Registered Unbuffered memory (2x8GB, so I can upgrade to 32GB later) ($240)
- Norco 4224 chassis ($460)
- Norco replacement fan wall for 120mm fans ($10)
- 3x 120mm fans (quiet but high flow) ($12 each, $36)
- 3x Intel SASUC8I HBA’s. (LSI 1068 based, each have 2x SFF8087 connectors, so support 8 drives each) ($163 each (inc freight), $489)
- 6x SFF8087-SFF8087 SAS cables ($60)
- Corsair HX1000 PSU (modular PSU) (Already had, the newer model is $250)
- Terminal blocks, molex wiring looms, velcro etc ($30)
- Subtotal : $2085 (without drives)
I started off by fitting the replacement fan wall and fans. Then I marked and drilled the sides of the rear area to support 3x 2.5" SSD’s mounted internally. As I was intending on booting from a USB drive and using rear mounted SSD’s for cache.
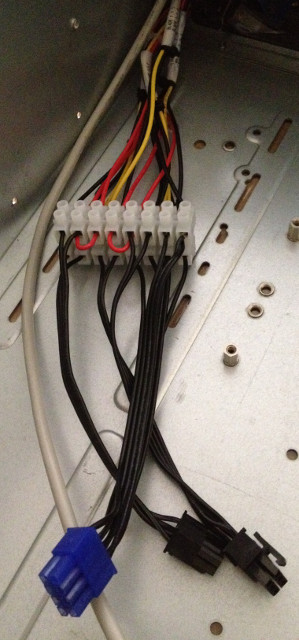
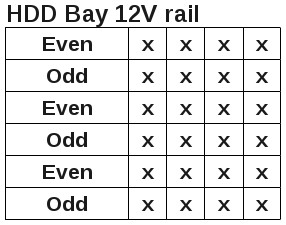
Next up I worked out how I was going to wire the hot swap backplanes power. Each of these horizontal blades support 4 drives and have 2x standard 4pin molex power connectors. As my power supply has two separate 12V rails I wanted to try to balance these rails as evenly as possible. So I wired up the blades to alternating supplies - even numbered to one, and odd numbered to the other. This resulted in me using some terminal blocks and wiring off to the modular power connectors directly.
Here’s the result.
After this I fitted and tested the powersupply and fans. Then the mainboard, CPU and RAM were installed. Now it was ready for some initial testing. Then the SAS HBA’s and further testing.
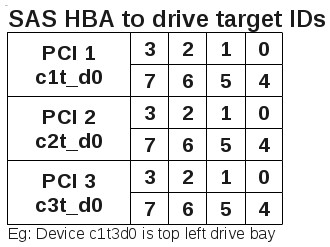
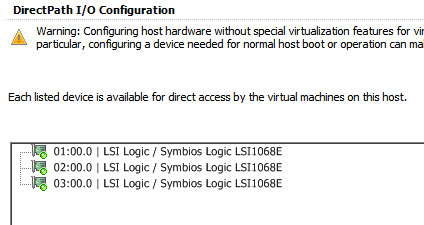
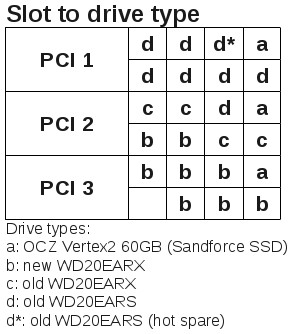
Once the SAS HBA’s were installed I was able to map out which slot mapped to which device. Fortunately this wasn’t hard to figure out and somehow I had 11 spare disks to assist with this mapping out. On this mainboard, the first 3 PCIe slots were direct to the CPU, and the rest were off the chipset, so I used the top 3 slots (which I number 1-3 from CPU working away, see pic further down). What I ended up with was;
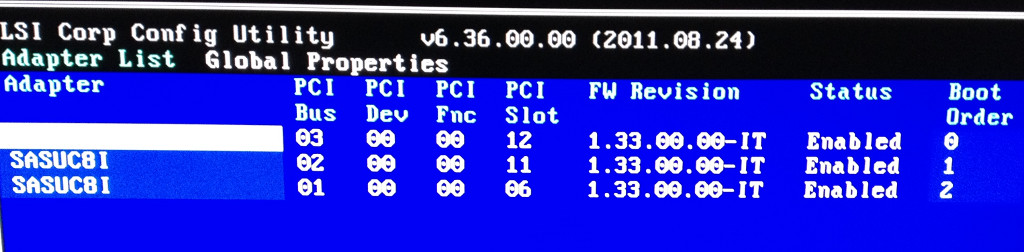
I also took the time to reflash the cards from integrated RAID (IR) mode to initiator target (IT) mode as in this mode it’s not so fast to kick out a possibly failing disk (which allows the use of green power drives with fewer issues). After a bit of messing around in UEFI to do this I ended up booting the Win7 install disk and using the command prompt there.
Now for the software side of things. I’d been working on my own OpenSolaris/OpenIndiana derived NAS distribution for a while, but was also interested in trying OmniOS and SmartOS on the hardware. What I found was SmartOS wasn’t the best idea for what I wanted. OmniOS was a good start but I’d want to build my idea of a NAS system on top of it (already on my todo list in fact). So for the time being I’d still run my own system.
Then I tried running this within a VM under ESXi. I’d read of a few people doing this with great success however I was skeptical at first - partly due to concerns over how failure situations would be handled. Would a failing disk cause the system instability or worse? However after playing with it and swapping disks hot, I’m much more confident that passing through the whole PCIe card solves any concerns there. The important thing is you need a mainboard and CPU that support the VT-D feature.
The other concern with running a virtualised file server was around performance and latency. I’m glad to report there is such a minimal difference on this hardware that it’s not worth thinking about. I did some benchmarks with NetApp’s Simulate IO (SIO) tool which shows nearly identical performance before/after. These were done with a 10 disk raidz2 zpool made up of 500GB WD blue drives spread across 3 HBA’s.
The exact command line used was sio_ntap_win32.exe 0 0 64K 1900m 90 50 V:\testfile. The parameters are Read Percentage, Random Percentage, Block size, File Size, Duration (seconds), Thread count, Filename. Using 0 for Read% means only write, and 0 for Random% means sequential. The point of this tool is to simulate IO, so we deliberately use a high number of threads (50) to cause high IO, and a large size to reduce the benefit of memory caching on client and server. For comparison I’ve included a local SSD run of the same thing. The most relevant figures in here for comparison are IOPS and KB/s each of these are best of two runs.
Baremetal install
|
|
Vmware virtual machine install
|
|
Single SATA2 Sandforce based SSD (Win7 NTFS)
|
|
Direct disk copies from my desktop PC’s SSD’s were limited only by the network. 112MB/s write speed sustained for 30GB (using 4GB test files) over CIFS. Baremetal and virtualised had the same speed - no difference at all.
Next I had to decide how the cache disks would work. With ESXi on baremetal booting off USB, I had an SSD as a datastore to contain the filers boot disk. To provide the cache disks I had a few options:
- put them on the SAS cards (losing hot swap bays)
- attempt a whole disk passthrough in VMware (RDM?)
- put a datastore on it and assign a large vmdk to the guest
- or probably a few other options
It didn’t look like I could pass through a whole disk off the onboard controllers, so that was out which left me with a datastore layer of overhead or losing hot swap bays.
Then I had to decide on how to expand my zpool. Going into this upgrade I was using some very old hardware (5-7 years old) with drives that were about 2 years old (oldest 5 were 6/feb/2010). There were 10x 2TB WD Green drives in this raidz2 zpool, one with known bad sectors. Earlier in the year when I had purchased an additional two drives due to disk failures that turned out to be a failing mainboard. So I had 12 disks to work with, 1 a little bit dodgy (64kB bad out of 2TB).
Working from the ZFS optimal raid size plan, I decided the next optimal size up from where I was would be one of the following;
- 2x vdev’s made up of 10 disks raidz2. 20 drives total, 4 parity disks (yes I know it’s striped parity).
- 1x vdev made up of 19 disks raidz3. 19 drives total, 3 parity disks.
So if I allow my dodgy disk to be used as a hot spare, the second option gives me a wider stripe of 19 disks, ultimately better protection to multiple disk failures and still 20 disks in the chassis. Finally I decided to put the cache disks onto the hot swap trays as I had 4 bays free. Why not put 3 SSD’s in there then. So that’s the plan. Right now there’s 2 in there with a 3rd going in once it’s been reclaimed from it’s current machine. The SSD’s have been partitioned (GPT) to have a 2GB slice at the front for ZIL, and the rest of the disk for L2ARC. ZIL mirrored, L2ARC not.
Initial Data Seeding.
To copy my data on I used zfs send/receive via a utility called mbuffer. Mbuffer helps smooth out any drops or bursts in IO on the sending side to help maintain a higher average speed of transfer over the network. In the past I have had some issues with this when sending a whole dataset. This time around however I had no such issues and was able to copy the entire dataset in one continuous operaion.
summary: 12.5 TByte in 39 h 49 min 91.4 MB/s
Now for some final benchmarking (this is with 100GB L2ARC, 2GB ZIL and the 19 disk raidz3 of 2TB WD Green drives)
CIFS: sio_ntap_win32.exe 0 0 64K 1900m 90 50 V:\testfile
|
|
NFS4: ./sio_ntap_linux 0 0 64K 1900m 90 50 /storage/siotest/testfile
|
|
Big test (working file size > memory + l2arc size):
CIFS: sio_ntap_win32.exe 0 0 64K 140g 300 50 V:\testfile2
|
|
NFS4: ./sio_ntap_linux 0 0 64K 140g 300 50 /storage/siotest/testfile2
|
|
And now for a real world comparison I ran the same tests on an idle (not in production) NetApp FAS2240-2. However as the test machine was not the same I had to perform benchmarks of my system again from this client. It turned out the test machine is a pile of crap when it comes to network load testing.
CIFS to NetApp FAS2240-2 (19 disk RAID-DP aggregate of 600GB 10k SAS disks - tested from a dual core, 6gb ram laptop via a crossover cable) sio_ntap_win32.exe 0 0 64K 1900m 90 50 Z:\testfile
|
|
CIFS to my system, same laptop. sio_ntap_win32.exe 0 0 64K 1900m 90 50 Z:\testfile
|
|
CIFS to the NetApp again, 49GB test size (didn’t have time for mkfile to produce a larger file) (volume not deduped, no flash cache, no flash pool, controller has 6GB RAM, 768MB NVMEM). sio_ntap_win32.exe 0 0 64K 49g 300 50 Z:\testfile2
|
|
CIFS to my system, same laptop, large file test (140gb - unfortunately I didn’t test with a 49gb file to equal comparison however that could have fit in L2ARC so wouldn’t have been fair anyway) sio_ntap_win32.exe 0 0 64K 140g 300 50 Z:\testfile2
|
|
CIFS to my system, from original desktop pc (showing just how crap that laptop is - tests run on same day as the laptop tests for a control sample) sio_ntap_win32.exe 0 0 64K 140g 300 50 Z:\testfile2
|
|
Interpreting the SIO results can be a bit of dark voodoo. Unfortunately I wasn’t able to test the NetApp with a more realistic system - the laptop is clearly crap achieving only 37% of the IOPS my desktop could achieve over the same network. Ignoring the crap laptop for now, this shows that the NetApp is clearly superior (as what should be expected) however my a much smaller margin that I had expected. On the small test (which would fit in the ram of both systems) the NetApp achieves 18% more IOPS (and throughput). For the large test the gap widens dramatically (however test sizes were different). I’d be willing to bet the NetApp had much more headroom available for load than my system did - of course this wouldn’t be visible with such a crap test machine. Due to this I think these tests are flawed and totally useless, apart from proving that my work laptop fails at networking.
One thing I did notice while running these tests which I’d never seen before, was large use of the ZIL. Previously when I had a mirrored ZIL on SSD’s I’d allocated 8GB for it, however I’d never seen it above about 200MB ever. I based 8GB on the old “how much data could you ingest in 30 seconds, and double it”. Allowing for a maxed out 1Gbit interface, 8GB seemed a good number. However I never saw it anyway near used. So this time around I worked out a 2GB number from a more conservative “how much data could you ingest in 8 seconds, doubled”, and working from 125MB/s. 8 seconds because the default flush interval is 5 seconds. In practice when writing flat out the disks are all only hit for a burst every 5 seconds. Part of this ZIL sizing comes from my NetApp experience where the NVRAM/NVMEM performs ultimately the same function (but is battery backed for power loss/crash consistency). Only the biggest NetApp system has 8GB NVRAM and it can easily write from a filled 10GbE interfaces out to over 1000 disks. Consider the FAS2240 I’ve been comparing it to, that has 768MB (which also is halved if used in an HA pair because it’s a mirror of the partner’s NVMEM too). This suggests I might be around the right ballpark even though the comparison is not totally apples:apples.
During the large file NFS SIO tests above I ran a quick zpool iostat -v 5 300 and spotted ZIL usage above 1.5GB! Fortunately it didn’t stay there and hovered around 1GB for most of the test. Perhaps 2GB is close to correct, if not slightly too small for this system? Following is the zpool iostat while running NFS SIO tests;
|
|
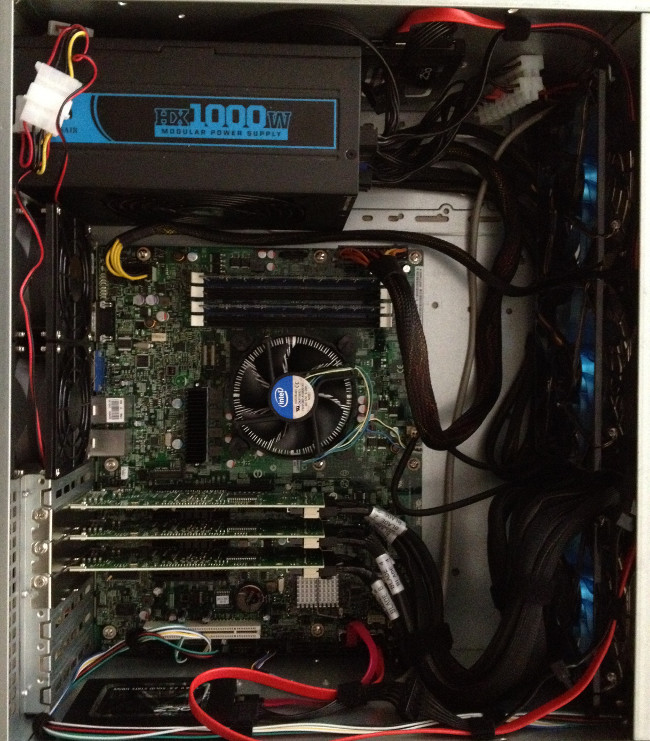
And for the overall happy snaps. This is a nearly finished internal shot of the rear part of the case, showing the mainboard, two cooling fans (which now have 50ohm resistors in series to slow them down) and the nearly finished cable routing. The PCI cards are HBA1, HBA2, HBA3 from top to bottom. On the Intel SASU8CI card, the connector closest to the mainboard is SAS ports 0-3, and the other connector is 4-7. Since this photo was taken I’ve also added 2 more 8GB memory modules (taking it to 32GB total), the Intel Remote Management Module (RMM) (which gives me remote console, remote cdrom/usb capability) and an Intel Quad port ethernet card.
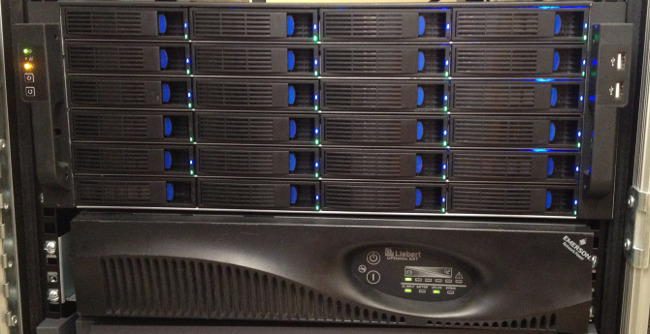
Front view showing the UPS too. Despite being brand new I do have a failed drive presense LED on bay 15 (4th down on left) which I need to find out about replacing.
Yikes, this has turned into quite a big write up. In a future post I’ll go into more detail of the software side particularly my custom openindiania thing.